نتيجة البحث
تم العثور على 478 عنصر لـ ""
- the escape manga مانجا عربيةع عن هروب سجينين
الهروب الفصل كاملاً ١٠/١٢/١٨ التّعليقات حول المانجا comments debug التّعليقات تسجيل الدخول اكتب تعليقاً اكتب تعليقاً مشاركة أفكارك كن أول من يعلِّق.
- أول موقع عربي لتعليم الرسم و التحريك و الانمي و المانجا
أول موقع عربي لتعليم الرسم و التحريك و الانمي و المانجا أهلاً بكم جميعاُ ، في مدونتي الجديدة ، التي قمت بافتتاحها خصيصا لأشارككم أفكاري ، ابتداءً من قناتي على يوتيوب التي قمت بإنشائها منذ عام 2013 ، و من هناك كنت أشارككم فيديوهات عن الانيمشين و الانمي ، و انميشين كنت قد صممتها بنفسي، و أسعدني تفاعل الجمهور معي ، و إعجابهم بما كنت أقدمه . لم يكن الأمر سهلاً ، فأن أنشئ موقع كامل من أجل أن اشرح الانمي و الرسم و التحريك، فإنها لمسوؤلية كبيرة و الأن ، قررت الإتجاه إلى منحنى أخر ، لطالما كنت أعشقه ، و هو الأشغال اليدوية ، و التي كنت أصمم بعضاُ منها في المدرسة ، و عندي كم هائل من الأفكار ، سوف أحاول أن اقدمها في مدونتي ، و في قناتي على يوتيوب ، أتمنى أن تمنحوني تشجيعكم ، حتى أواصل عملي. شكرا لكم. #اول #تدوينة #اولتدوينة #مدونتي #اولمشاركة 2.0 2 أعجبهم متوسط التقييم هو 2 من 5, على أساس 2 عدد الأصوات, أعجبهم شارك Love it? Rate it Not great Don’t love it Not great Satisfied Really good Love it
- How to Animate a Walking Anime Character Using Animation Bones: A Comprehensive Guide
How to Animate a Walking Anime Character Using Animation Bones: A Comprehensive Guide Welcome to a special lesson, in which I will show you how to animate a walking anime character, from the side, using the Toon Boom Harmony program, without the need to draw at all. Just follow the steps with me carefully. This is an anime character that I designed using the Toon Boom Harmony program from several locations, and I saved it in the library, until it is used in animation. In today’s lesson, I will choose to move him from the side, as shown in the picture, and delete the rest of the unnecessary frames. Note, this program is intended for computers How to animate a walking anime character The first thing we must do is to activate the animation feature, and then after that, we go to the “Transform” tool, which is present in the program, and the animation method is as follows: We move the right leg forward Left leg backwards Right arm backwards Left arm forward We press on the leg and press the letter B, and it will be identified with us, and it is necessary that the keyboard be in English. Then we add a key frame or “key frame”, after we go through the number of frames or frames we want, and we move, but this time in reverse: We move the right leg backwards Left leg forward Right arm forward Left arm backwards The walking speed of an anime character depends on the number of frames. The higher the number, the slower the movement. Now between the two movements, after we have completed the first stage, now comes the rhythm stage, which is the young man rising and falling upward, but very slightly without exaggeration. All we have to do is add a key frame for the “peg” or “peg” of the entire body, in the middle between the two movements, and add a key frame, and raise the character a little to the top. Here we move towards the leg, and we are in the frame after the middle, and we press the letter B, then we bend the knee slightly, raise it up, and raise the foot slightly. This will benefit us in order to improve the young man's gait. This method can work better than any other program that uses bone animation We have finished the animation, and all we have to do now is just copy the animation, without needing to move it along the timeline or time line. We define the frames from the beginning until the frame at which the movement ends We copy We click on the last frame of the movement We paste over it We repeat this process along the schedule, and for the duration we want for the animation, in order to animate a walking anime character. Add a background to the scene We choose the option that I specified for you in the image below, and then we add any anime image from our computer, after which it will appear within the program. We add a “Peg” to it, and a “Keyframe” keyframe. We go through several frames, choose the “Transform” tool and drag the background from the left of the screen to the right, in order to make it appear as if it is moving when the young man walks. The issue of movement speed is up to you. If you reduce the frames, the anime background movement will be faster, and vice versa This is the final result for “animating a walking anime character.” We animated a young anime man walking with ease, and without the need to draw. All we did was that we added it from the library, ready-drawn, and animated it in a very simple manner, without complications. I hope the explanation was satisfactory. Your approval, and there are more lessons coming to the site, God willing. If you have any questions about the program, write a comment, or message me. متوسط التقييم هو null من 5, على أساس 0 عدد الأصوات, أعجبهم شارك Love it? Rate it Don’t love it Not great Satisfied Really good Love it
- Learn to draw manga by adding dialogue balloons
Learn to draw manga by adding dialogue balloons Today we will complete a series of teaching Arabic manga drawing, and we will talk about the easiest step in the manga industry, which is adding speech bubbles, or what is known as dialogue balloons, which is a balloon in a certain way, which we add to the manga scenes, and through it the character speaks, and expresses what wanders in her mind. The method is easy, now let's see how Write dialogue It is necessary to write the dialogue in any program we want, and as we learned previously, we write the story and the script before deciding on the drawing, as we copy the required dialogues, as shown in the image below, and add them to Photoshop, and choose the desired font Copy the sentence After we have added the sentences to Adobe Photoshop, we select the entire page, and copy the page I do this because the program I draw manga with does not support Arabic yet It is necessary that the page does not contain any backgrounds Add balloons After we added the words, we now include the balloons for each sentence, and it is necessary to understand that each case has a special balloon that expresses the feelings of the manga character, as we cannot put the same balloon for each scene This does not include the balloon shape that you adopt for your manga, I'm talking about the balloon that expresses feelings of shock, fear and other things... On this page the balloons were normal Adjusting the balloon to suit each scene The next step, is to modify the bubbles that we added, and we mention here, only the necessary scenes, we choose the scenes that express the special situation of each character, and we look at forming speech bubbles and choose what fits with the phrase, we pull out the balloon and add it in a new layer , and adjust its size Add the arrow pointing to the characters The last step for the manga dialogue bubbles left for us is to add the arrow that points to each speaker, from the left window, we choose and define the starting point that should be close to the manga character, and we simply point the balloon arrow towards it Add dialogue to manga We go to the manga drawing program, and paste what we copied earlier, and as you can see in the picture, the text has appeared in front of us But it has a white background, at the bottom you can see how to get rid of it in a second We go to the following option: Edit > Convert brightness to opacity In this way, the white background will disappear and we will have only the dialogue, and we can add it and drag it towards the balloon designated for it, which is related to the manga character who is speaking Distribute phrases to manga characters In the options on the left side, there are many selection tools, and we choose from them what is written at the bottom Selection area > Rectangle Next, we select the required phrase, and we drag the sentence towards the balloon In this way, we have learned how to add balloons and speech bubbles to our manga, and it did not take much effort, you can play with the shapes of dialogue balloons as much as you want, and create shapes that fit with your comic, and I meet you in a new lesson. متوسط التقييم هو null من 5, على أساس 0 عدد الأصوات, أعجبهم شارك Love it? Rate it Don’t love it Not great Satisfied Really good Love it
- How to color anime eyes step by step
How to color anime eyes step by step I welcome you to a beautiful and quick explanation, through which I will show you how to color anime eyes in a very attractive way, and this method I use sometimes when I draw the face, so that the eyes appear beautifully in the drawing. And the steps are very easy, and we will rely on one color, from shading and gloss, and let's start. But first of all, open the anime drawing program, and if you do not have it yet, you can download it from here: Here Drawing the eye : First we draw the eye that we want to color We color the eyes and skin in the desired colors, and here I chose the light pink color Coloring : We start by adding a light shadow to the lens of the eye from above he anime drawing program, and if you do not have it yet, you can download it from : Here Then, with the brush tool, we shade from the upper side of the lens, and go down a little while pressing on the pen in the form of points, that is, we hold the pen and click when we reach the edges Now we add a darker shading than the previous one, on top of the first shading, in the same way The stage of gloss or "highlight", by choosing a light color, we use the waterbrush tool, and draw the gloss at the bottom At this point, we add eye details, such as the pupil "black dot" and the white inside the iris And the final touch, we add a little light on the eye, above the eyelashes, and some shading on the skin In this way, we have learned together how to color anime eyes, in an easy and fast way, and in a way that your drawing shows that it is professional! Follow these steps, and practice them, and by the way, you can use a lot of colors instead of pink, and do the same steps, and the result will be great. There are more lessons to come, don't miss it with me, see you all right. متوسط التقييم هو null من 5, على أساس 0 عدد الأصوات, أعجبهم شارك Love it? Rate it Don’t love it Not great Satisfied Really good Love it
- كيف تصبح انمي انميتور بدون دورات
كيف تصبح انمي انميتور بدون دورات كيف تصبح محرك انمي من منزلك في الآونة الأخيرة انتشرت انميات من صنع الهواة، في قنوات اليوتيوب و الانتسغرام، و السبب يعود إلى شهرة الانمي الياباني، و توافر البرامج و التطبيقات التي تتيح لنا صناعة الانمي و الكرتون من المنزل من دون خبرة ، و بما أنني بدأت بالتحريك منذ أكثر من 14 عاماً ، قررت أن أشارككم بالحيل و الأسرار التي مكنتني من أن أصبح أنميتور "محركة" بدون دورات أو شهادات. إبدا الرسم مما لا شك فيه أن موهبة الرسم من أهم العوامل الأساسية في مهنة الأنميشين ، إذا أن الأنميتور هو في الأساس رسام ، و من يعرف الرسم ، سيجيد بلا شك التحريك ، لأن التحريك هو الرسم المستمر و المتواصل للفريمات ، للوصول من الحركة أ للحركة ب، و من الصعوبة بمكان أن تصبح محركاً وأنت لا تمتلك موهبة الرسم. ولكن الجانب الإيجابي هو أنه يمكنك أن تتقن الرسم بالتعليم و التدريب المتواصل، فهناك العديد من الدروس أونلاين، و منها في موقعي هذا ، حيث أبسّط لكم الخطوات . و من الضّروري أن تتحلى بصفة الصبر ، فإنك لن تقدر أن تنجز انمي كامل بين ليلة وضحاها ، فنحن نعلم أن الاستدوديوهات اليابانية تحتاج إلى جيش من الرسامين من أجل إنجاز انمي واحد ، فما بالك بشكل يعمل بمفرده. يمكنك إيجاد بعض دروس التحريك هنا في قناتي دروس الأنميشن حاول قبل أن تبدأ مشروعك، أن تجهز الجدول الزمني للانمي ، هل سوف تنهيه في شهر؟ و كم المدة؟ و أنصحك بالبداية أن تبدأ بعمل انمي مكون من حلقة واحدة ،بمدة لا تتجاوز الثلاث دقائق، لأنك إن أكثرت على نفسك، لن تنهي المشروع، و لكن إن كنت تعمل ضمن فريق، قسموا المهام بينكم كيف تحسن أداءك في الأنميشين ؟ استخدم برنامج الأنميشين و صمم مقاطع صغيرة من باب التسلية ، من أجل أن تنمّي مهاراتك ، لا تأخذ تلك المقاطع على محمل الجد ، حتى لا ترهق نفسك ، فقط تسلَ و أنت تحرك شاهد العديد و العديد من الأنميات ، وعندما تجد لقطة أعجبتك ، قم بإعادتها ، حتى تكتشف كيف تم تحريكها ، فالانمي كنز تعلمت منه التحريك بدون دورات ارسم الحركة الأولى و الأخيرة "كما شرحت في دروس سابقة" و تدرب بالرسم كيف تنقل الشخصية من هذه الوضعية ، لتلك ، يمكنك ابتكار عدة طرق ، وعندما تجد الحركة المناسبة ، ارسم و لون ان استصعب عليك تحريك شيء ، ادخل مواقع الانترنت ، أو اليوتيوب، وابحث عن كيفية تحريك جزأ من الجسم ، مثلاً الشعر أو العينين، و إبدا التطبيق فوراً " هذه إحدى الطرق التي ساعدتني في أن أصبح أنميتور أفضل" تحريكي لعين ترمش كيف تقوم بتحريك الانمي ؟ شاهد أي انمي تحبه قبل الأنميشين ، فهذا سوف يحمسك للبدأ في العمل حاول قدر المستطاع إبعاد جهازك الخليوي من أمامك و أنت تعمل ، حتى لا يشغلك شغل أغاني انمي في الخلفية و أنت تعمل ،هذا سوف يساعدك كثيراً في أن تدخل الجو خذ استراحة من التحريك كل ساعتين ، تنشق الهواء في الشرفة ، أو اشرب النسكافيه أو كُل بعض المقرمشات قبل العودة للعمل شاهد تقنيات التحريك على اليوتيوب، و ابتكر أسلوبك إن شعرت بالملل فيي منتصف التحريك ، توقف حالاً ، لأنك إن استمررت ، سوف تحرك بدون اهتمام على اليمين السكتش ، واليسار المشهد النهائي ماذا تحتاج ؟ الجهازان اللذان تحتاجهما ، هما الكمبيوتر أو الحاسوب المحمول "اللاب توب " ، و تابلت صغير و قلم للرسم لا غير ، ما من داعِ للاستديو المنزلي الذي تشاهده في قنوات اليوتيوب، فالمعدات الغالية ، لن تعطيك الموهبة ، ولن ترفع من شأنك ، فلا تغتر بما يمتلكه غيرك من رسامين، فأنت هو الموهوب و أنت من تصنع، فمجرد امتلاكك لهذين الجهازين ، أصبحت جاهزاَ للإقلاع في عالم التحريك! و البرنامج المفضل لدي هو تون بوم هارموني ، فقد كبرت معه ، و أذكر كيف كان برنامجا بسيطا و صغيرا حين بدأت أعمل عليه ،ومع مرور الوقت، ازدادت مميزاته و أدواته. طبعا بمقدوركم التحريك بأي برنامج متاح لكم، مثل أدوبي انميت "فلاش سابقا" ، و كليب ستديو و موهو و غيرهم الكثير البرامج البرنامج خذ مكانك : ليس من الضروري إن أردت صناعة الانمي ، أن تعمل في التحريك و الرسم، فهناك العديد من المهمات يمكنك القيام بها، و كل ما عليك فعله ، هو أن تأخذ مكانك بحسب موهبتك التي تتمتع بها إن كنت كاتباً و مؤلفاً ،يمكنك تأليف القصة ، قصة انمي رائعة و ليس لها مثيل ، مع سيناريو مميز ، و تقديمها من أجل أن تصبح انمي أو رسم خلفيات المشاهد ، مثل الشارع ، و البحر ، و البيت من الداخل ، السماء ، و تجهيزها من أجل تقدمها للمحركين إن كنت تمتلك صوتاً جميلاً ، شارك في دبلجة الأنميشين، و اختر الشخصية التي تريد العمل عليها، و دبلجها و أنت تمثل بصدق غنِ للعمل ، سيكون رائعاً أن تصنع أغنية نهاية للانمي و تغنيها لو كان لديك صوتٌ جميل تقدر أيضاً أن تقوم بالمونتاج ، فبعد أن ينتهي الانمي ، تقوم بتجميع المشاهد كلها ، وإضافة الموسيقى إليها ، و المؤثرات الصوتية ،و كتابة أسماء المشاركين بالعمل تحريكي لحمامة تطير الخطوات لا تنتهي ، فعالم الانمي عالم كبير و جميل، ما إن تبحر فيه حتى لا تتوقف، صحيح أن التحريك يحتاج الوقت ، ولكن لما لا إن كنت تمتلك الوقت الكافي لذلك ، فبدلاً من أجل تجلس على هاتفك الجوال تشاهد محتويات تأخذ من وقتك و حياتك ، قم و اترك هاتفك جانباً ، وإبدا التحريك، لن تتوقف بعد ذلك ، و سوف تفتح أمامك أبواب كثيرة 2.0 2 أعجبهم متوسط التقييم هو 2 من 5, على أساس 2 عدد الأصوات, أعجبهم شارك Love it? Rate it Not great Don’t love it Not great Satisfied Really good Love it
- How to add sunshine to Toon Boom Harmony
How to add sunshine to Toon Boom Harmony Welcome to a quick and light explanation of how to add sunshine to the program Tone Boom Harmony, it is very easy, we will learn together how 1 We open Toon Boom Harmony "any version available", and then add the background you want to add the sun to I included a blue sky, and some white clouds 2 We go down to the "timeline" and look for "lens flare" in the search box, and as soon as we find it, we include it. By dragging the effects directly to the “Node View”, and we add them to the “composite” so that they appear on the screen 3 Here comes the sun in the scene, you can stop here, or move it, I will show you in a simple way: Click on the sun layer, and add the "Peg" to it. We put the "keyframe" or keyframes in order to move the sun We choose the move tool from the left column "Tool No. 3 from the bottom" and move the sun to any direction First frame Second frame Final scene متوسط التقييم هو null من 5, على أساس 0 عدد الأصوات, أعجبهم شارك Love it? Rate it Don’t love it Not great Satisfied Really good Love it
- ولادة مفاجئة مانجا ون شوت "ولادة مفاجئة"
Next ولادة مفاجئة اشترِ النسخة المطبوعة من المانجا من هـــنــــا التّعليقات حول المانجا comments debug التّعليقات (1) Giriş اكتب تعليقاً اكتب تعليقاً Sıralama: En Yeni Misafir 02 May 2023 جميل إعجاب رد
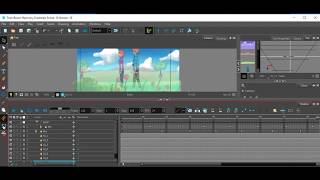
- Watch how I create a complete anime scene
Watch how I create a complete anime scene Welcome to a new post, after a long absence, and as I promised you earlier that I will make an cartoon movie, but I relented, because I am not good at the quality of cartoon, and because I prefer anime, I decided to make an anime movie instead, as you promised me, and I think I finished until Now 10 anime scenes, and I use Elton Boom Harmony 15 program, and because I like everyone to see how I work, I liked to share with you, how I made an anime scene, and as you can see in the video above, a scene from the anime movie that I am working on, And there is a girl and a young man walking in a forest, and there are trees and plants, a scene like this was very easy for me, it took me a few hours. At first I drew the background in another program, and I drew everything in a special layer, so the sky is in the last layer, and then the mountains are then the trees and the ground, and right in front of you you see the plants, I did so until the scene appears 3D, and I made the two characters walk in the middle between Layers, and when I moved the two characters and made them walk, I initially thought that it was complicated and that it would cost me a long time, but I used the cut-out technique and this technique made it much faster, because I drew every part of the body in a special layer, The head alone, the arm alone and the hand as well etc., and then I added the Peg as shown above, to each part that I wanted to move, so that the original drawing was not affected, and then I did the same thing on the other character, and in the end, I moved the camera For the scene to appear in 3D. It may seem complicated to you while you read all this, but with a program like Elton Boom Harmony 15, it is very easy, especially with those who learned it years ago, and in the end I advise you to try and learn all of that, because it is the simplest form possible. متوسط التقييم هو null من 5, على أساس 0 عدد الأصوات, أعجبهم شارك Love it? Rate it Don’t love it Not great Satisfied Really good Love it
- الحسين جيبران
< Back الحسين جيبران المغرب 20 Previous Next
- 三人娘アニメ | マイデザインから私の声をアフレコで
三人娘アニメ | マイデザインから私の声をアフレコで 11年ほど前、私は「私のための」特徴的で素晴らしいアニメをデザインしました。短編アニメで、おかしな状況にさらされる3人の女の子について話します。率直に言って、アニメにはストーリーを追加しませんでした 「いつものように」、彼らは 1 つの家に住んでいます。私は「スパイ、3 人の女の子、そして彼らは一緒に住んでいます」からインスピレーションを得ました。 このアニメの新しいところは、「私」に声を加えたことです。3 人の女の子の吹き替えでは、アフレコと同じように音のレイヤーを変更しながら実際に声を加えました。ここでは声を変更するプログラムを使用しました。 、ショットの 1 つで自動音声に変更されました。率直に言って、アフレコは楽しかったし、アニメに何か特別なものを追加したと感じました。 アニメーション、あるいはアニメーション、もちろん、私の最初で最後のプログラムである Toon Boom は古いバージョンです。 かつて私がどのようにアニメを楽しんでいたのか、そして経験は少ないにもかかわらず、なぜ「今感じている」退屈を感じなかったのかはわかりません。 いずれにしても、気に入っていただければ幸いです。 متوسط التقييم هو null من 5, على أساس 0 عدد الأصوات, أعجبهم شارك Love it? Rate it Don’t love it Not great Satisfied Really good Love it
- مانجا بماذا أناديك Chapter 5
Next الفَصلُ الخامِس الفصلُ السّابِق الفصلُ التّالي