
Hello everyone, welcome back to a new and unique lesson, the first of its kind on my site. In this lesson, we'll be discussing how to build a complete 3D anime room using SketchUp, which we can then use as a background for our anime projects.
My online store has everything you need as artists
It's even suitable for manga and webtoons, so there's no need to draw the stressful backgrounds by hand, as long as we can build the room once and use it repeatedly.
First step
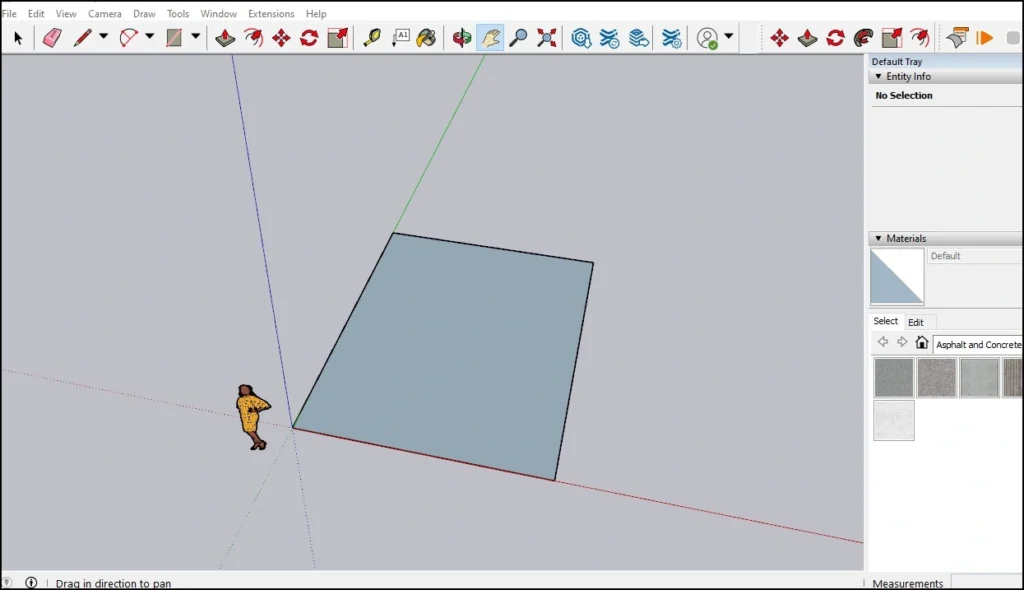
We open a new project in the program and begin by drawing a rectangle that will represent the floor of the room, using the rectangle tool. Rectangle Tool.
We determine the length and width of the room, and it is preferable that it be small because it is intended for one anime character.
There is a character that appears in the program, and it is what we will rely on to help us compare the size and length of the room, both in relation to the walls and the doors.
Step two
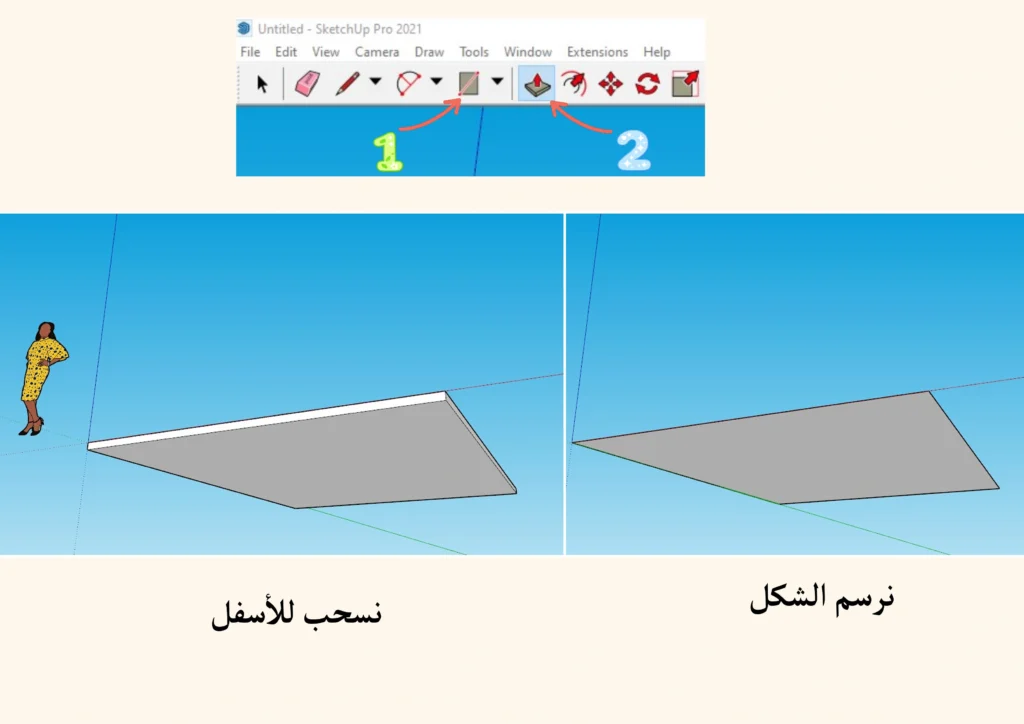
We will now begin using the payment and withdrawal tool. (Push/Pull Tool) To achieve a thicker floor, we pull the surface downwards slightly, resulting in a three-dimensional floor with edges, instead of remaining flat.
- Number 1: This is the tool we used to draw the floor. Rectangle Tool.
- Number 2: This is the tool that will draw the surface and add thickness to it. (Push/Pull Tool).
Step three
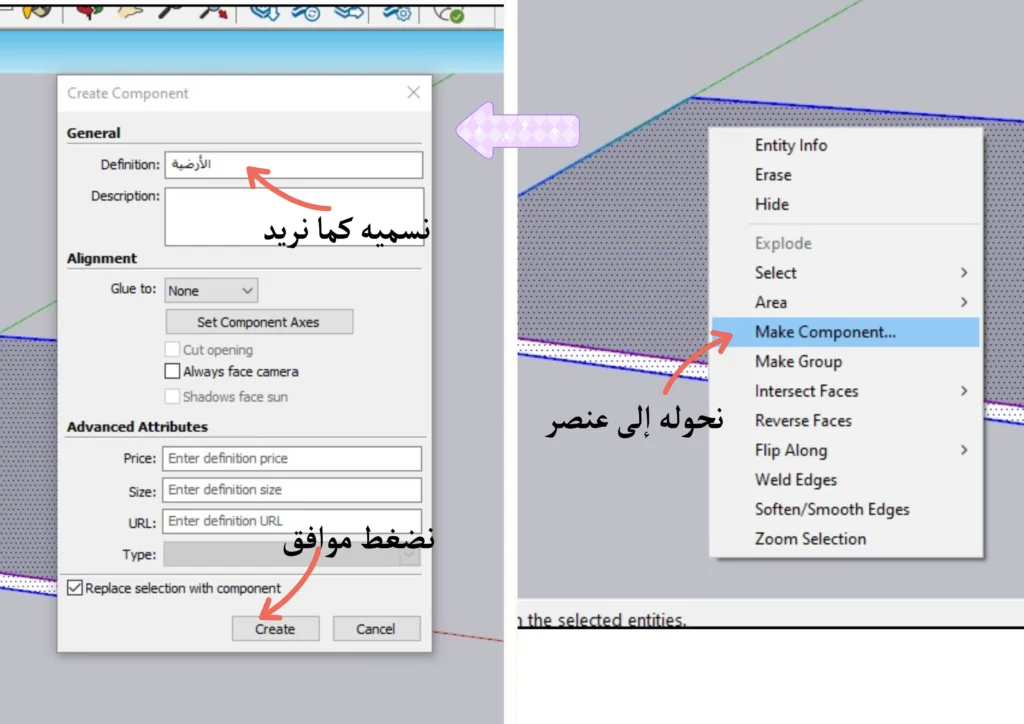
Now we will convert it into a single component:
- We define the floor completely, and we can press on it several times until the shape is defined.
- Right-click, then select the option that appears. (Make Component).
- After that, the settings window will appear, and we can change the name as we wish.
- Press the button Create.
Step four
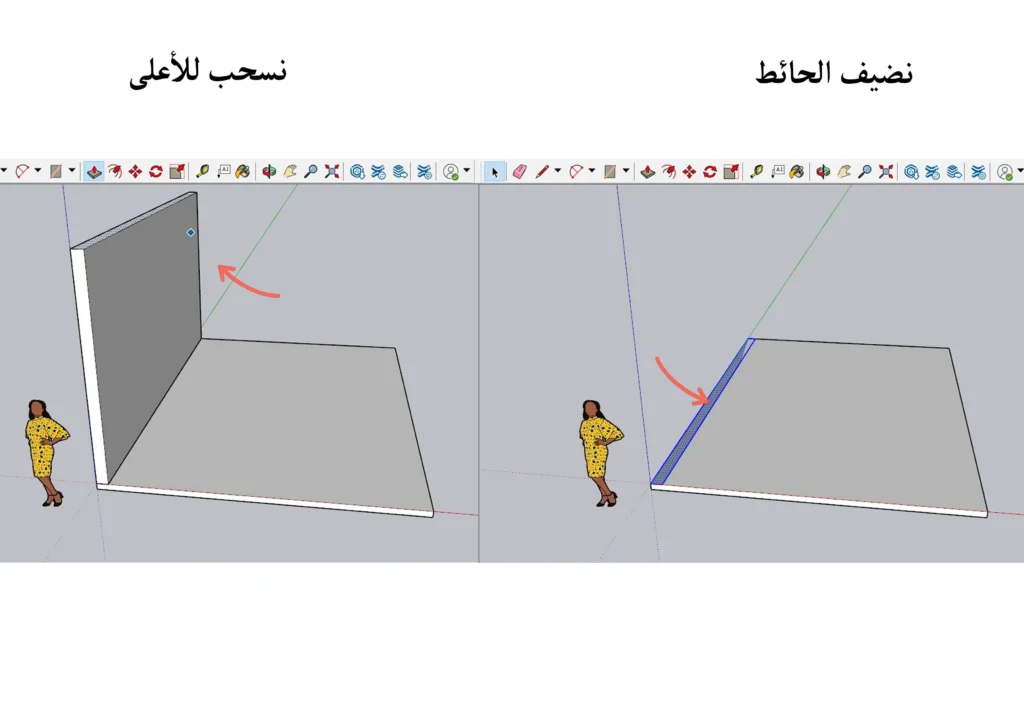
Next comes the stage of drawing the first wall. Using the same drawing tool. Rectangle ToolWe draw a rectangle on the floor, then select the push and pull tool. (Push/Pull Tool) We pull the shape upwards to get the height of the wall.
We select the entire wall, right-click, and convert it to a standalone element. (Make Component).
We make sure that it is connected to the edge of the floor on both sides of the room.
Step five
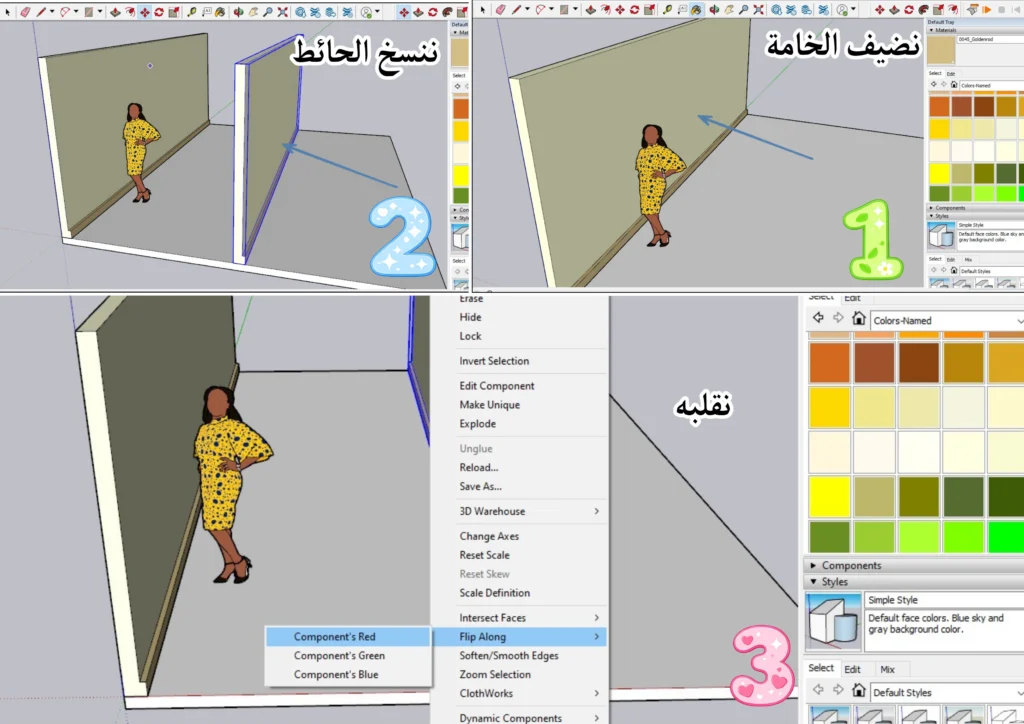
We locate the wall and make another copy of it, then flip it over using the following steps:
- Using the animation tool (Move Tool)We press the key Ctrl On the keyboard while moving the wall to copy it.
- We will have another copy, which we will drag to the opposite end.
- Right-click on the new wall.
- When the list appears, we go to the option Flip Along.
- A side menu will appear, and we will select Component's Red.
This is how the inner surface of the wall will turn inwards.
Note: Modifying one of the walls will apply the same modifications to the other wall at the same moment, because they are copies of the same component.
Step six
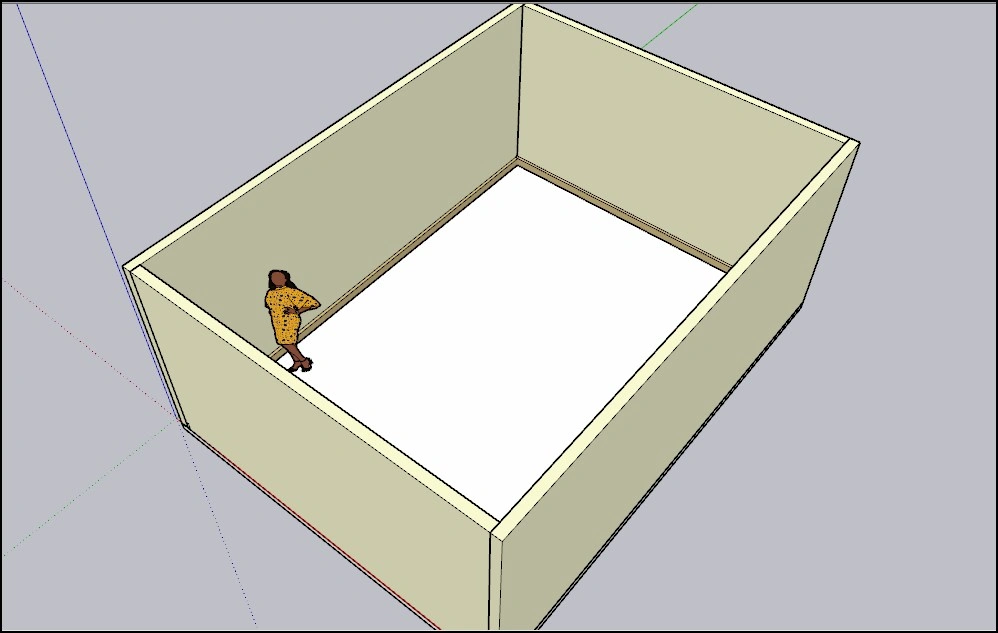
We repeat the wall replication step until we have a room surrounded by walls on all the required sides. We mustn't forget to ensure that the base of the wall is flush with the floor, with no gaps between them.
When copying a Component wall, the copies are linked together. Therefore, to separate the door wall copy from the rest of the walls, right-click on it and select Make Unique.
We currently leave the anime room open from the top so that we can work inside it freely.
Step seven
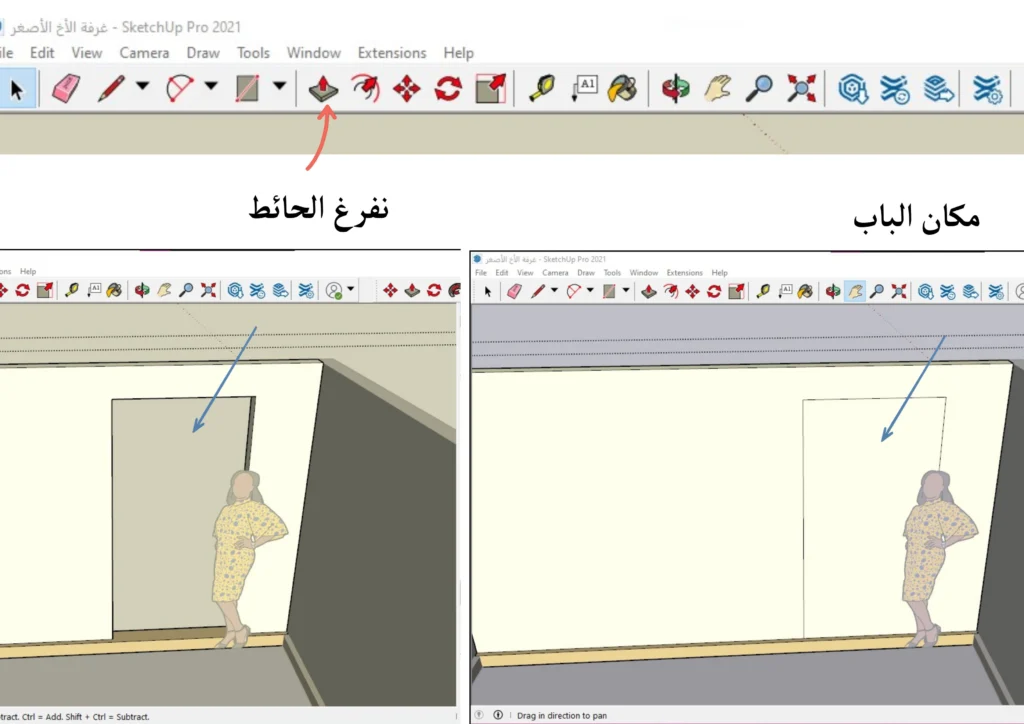
We go to the wall designated for the door and draw a rectangle on it that extends downwards using the drawing tool. Rectangle Tool. Then we select the payment and withdrawal method. (Push/Pull Tool) We pull the surface of the rectangle until it penetrates the wall, in order to obtain a real opening that will be the place for the door.
As you can see, there is a base for the wall in yellow. We identify its connecting ends at the edge of the door, and we also empty it.
Note: When pulling the surface of the door wall, it is sufficient to continue pulling until we reach the end point of the wall.
Step eight
Now we move to the window location. We identify the wall that should be a standalone copy, not a component linked to the other walls, and apply the previous step to it, which I will summarize briefly:
- We draw a rectangle.
- We choose a payment and withdrawal method (Push/Pull Tool).
- We pull the surface inwards until it penetrates the wall.
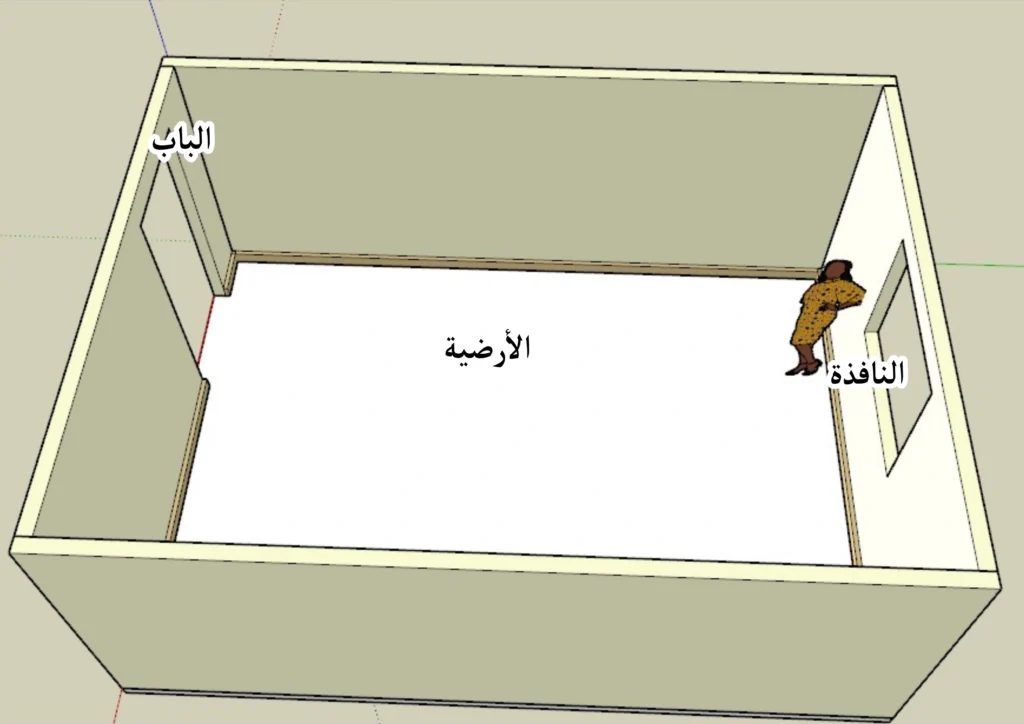
When we look, we find that we have prepared the foundations of the anime room, so we have the floor, walls and its own outlets.
Step nine
Now we've reached a very important stage, which is adding materials to the room. Here, I used artificial intelligence websites to generate a material for each element in the room, namely:
- Flooring material.
- Painting the walls.
- Ceiling material.
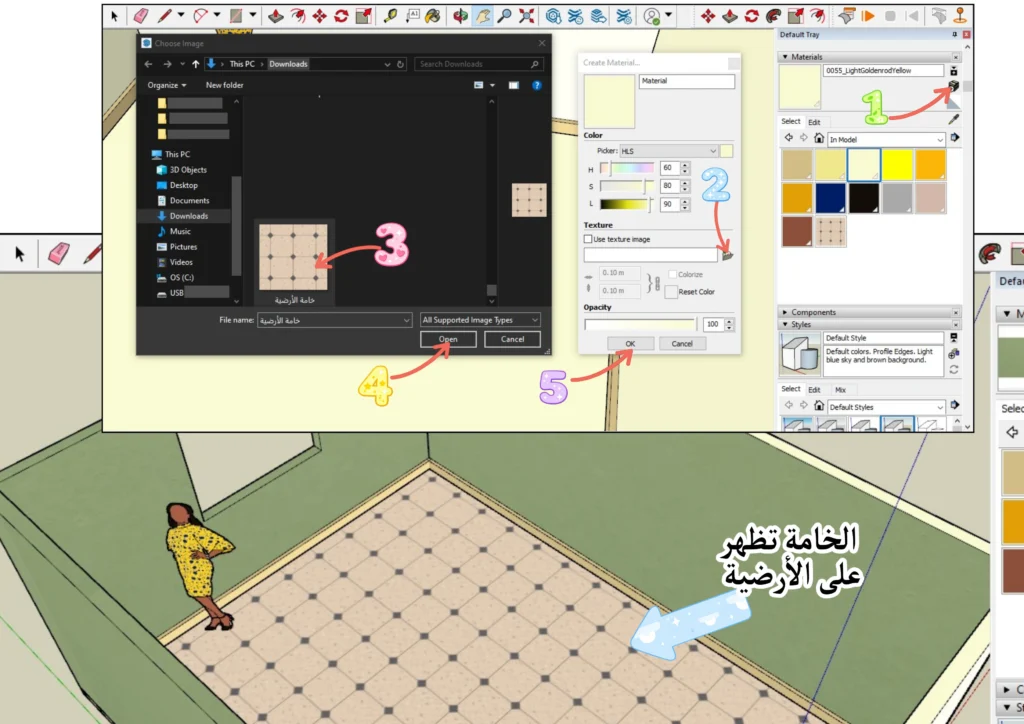
After we generate the images, we move on to the element to which we want to add the texture, which is the background, and the numbered steps according to the image are as follows:
- We select the floor and move to the right-hand menu, which is MaterialsThen we click on the "Add New Item" icon. (Create Material).
- New options will appear; click on the "Add New File" icon. (Browse).
- We select the image of the floor tiles on the computer.
- We press Open.
- We will return to the previous menu and press OK.
Step ten
We repeat the process, but this time for the door, and there is a different way to add material:
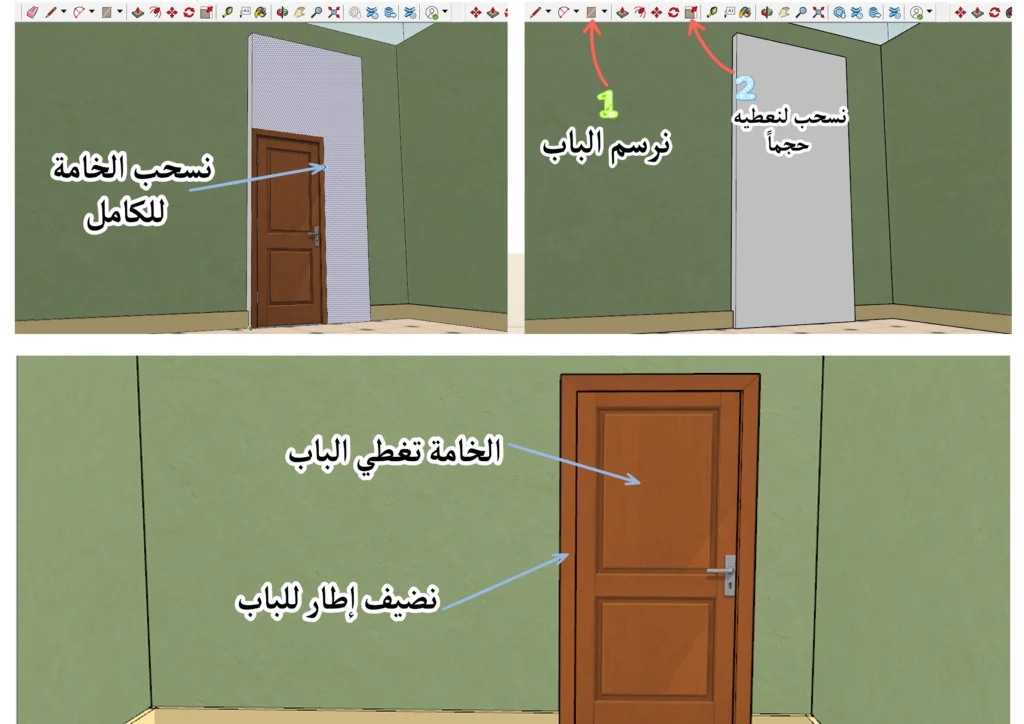
- We draw the door in the space we created earlier.
- We pull the surface to give it volume using a push-pull tool. (Push/Pull Tool).
- We go to the menu File From it we choose Import.
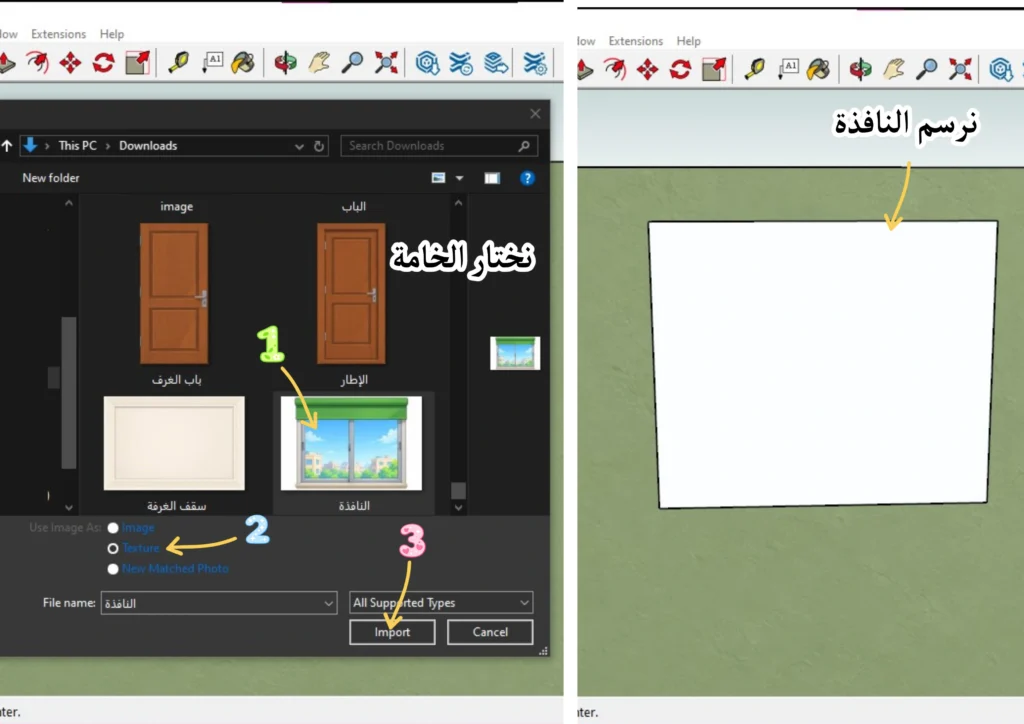
- We select an AI-designed image of a wood texture, and specify an option Use as Texture.
- We press Import.
- We apply the material to the surface of the door.
We add a frame around the door, but it must be a separate element on its own, and we apply to it the material we have chosen in the form of wood.
Step eleven
This step is similar to the previous one. After drawing a rectangle the same size as the space, we add volume to it using the tool. Push/Pull ToolThen we insert the image of the window we designed, which resembles an anime drawing style, and select the option Use as TextureThen we press Import.
Step Twelve
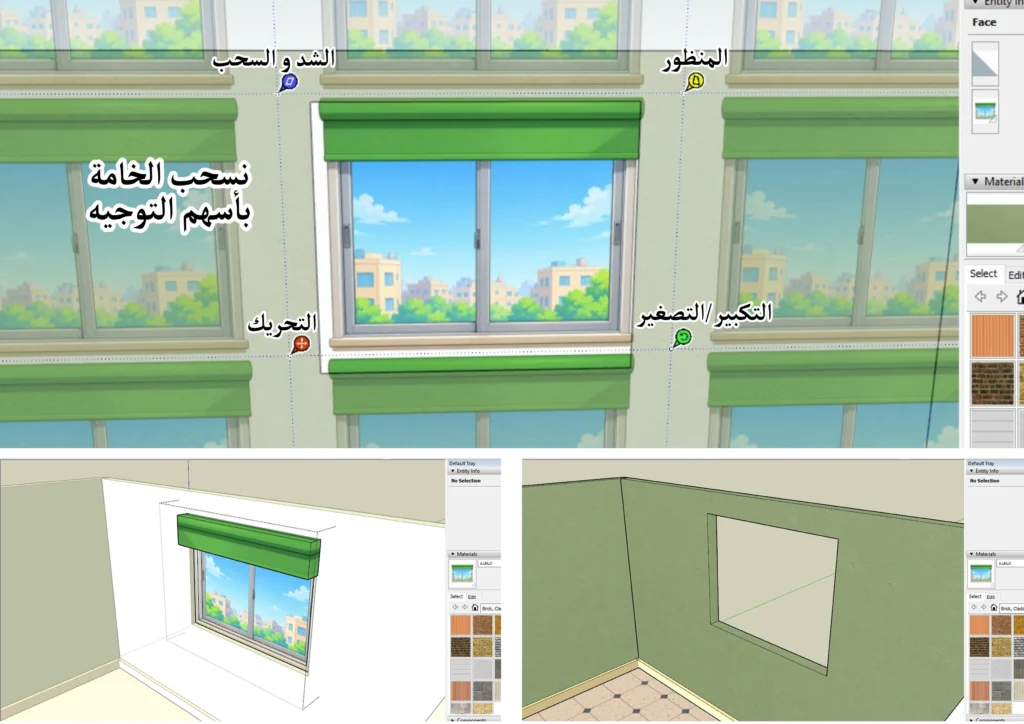
After applying a window image or texture, we can easily adjust the image size and position. The steps are:
- Right-click on the window surface.
- A list will appear containing an option Texture.
- We click on it, and when the side options appear, we choose Position.
We will then see the material adjustment knobs, which allow us to change its size, shape, and position. I will explain the function of each knob or lever:
- Yellow: Perspective (Distort): Changing the perspective of the material and tilting it to suit the surface.
- Blue: Stretch: Extending the material or changing its dimensions.
- Green: Scale/Rotate: Change the size of the material and rotate it.
- Red: Move: Moving the material from one position to another.
Step Thirteen
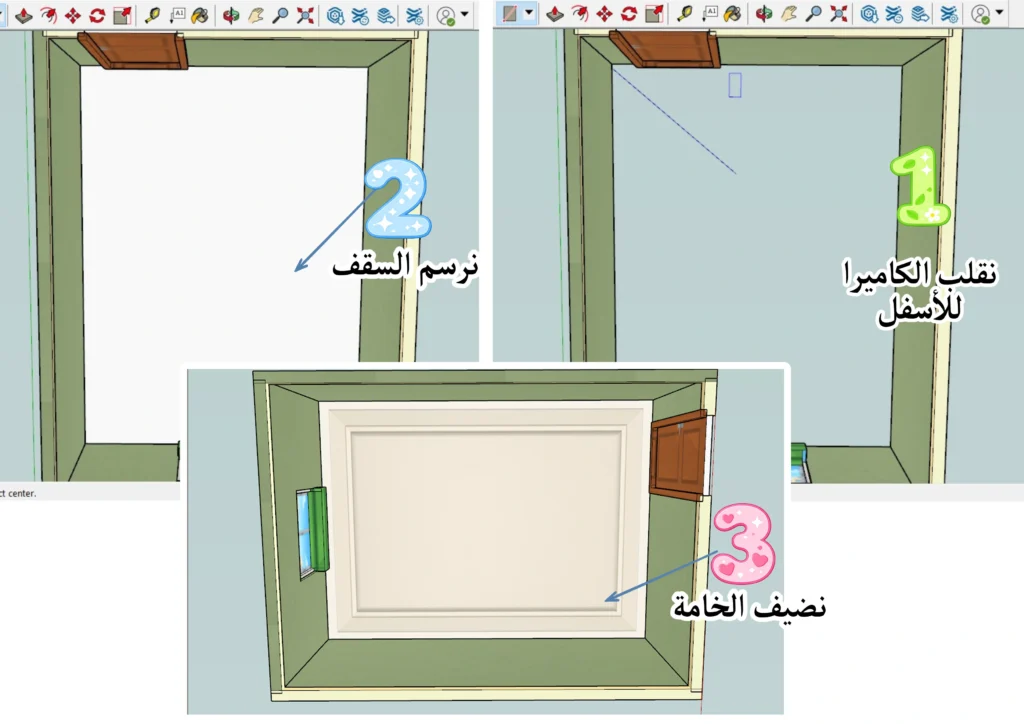
Now, in the final step, all that remains is to add the ceiling, to completely cover the 3D anime room, by drawing a rectangle with the same dimensions as the floor to cover the same space.
After we pull it out and add thickness to it, we insert the material in the same previous way, and it should be in the anime style as well.
We make sure to rotate the project screen or camera perspective to look from the bottom up, so that we can control the drawing and the view becomes easier.
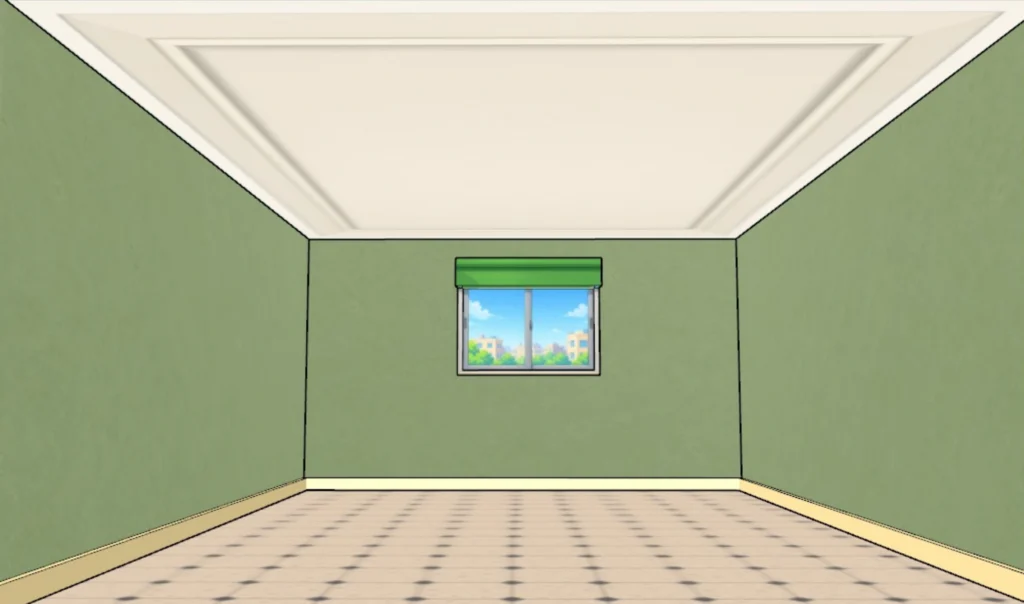
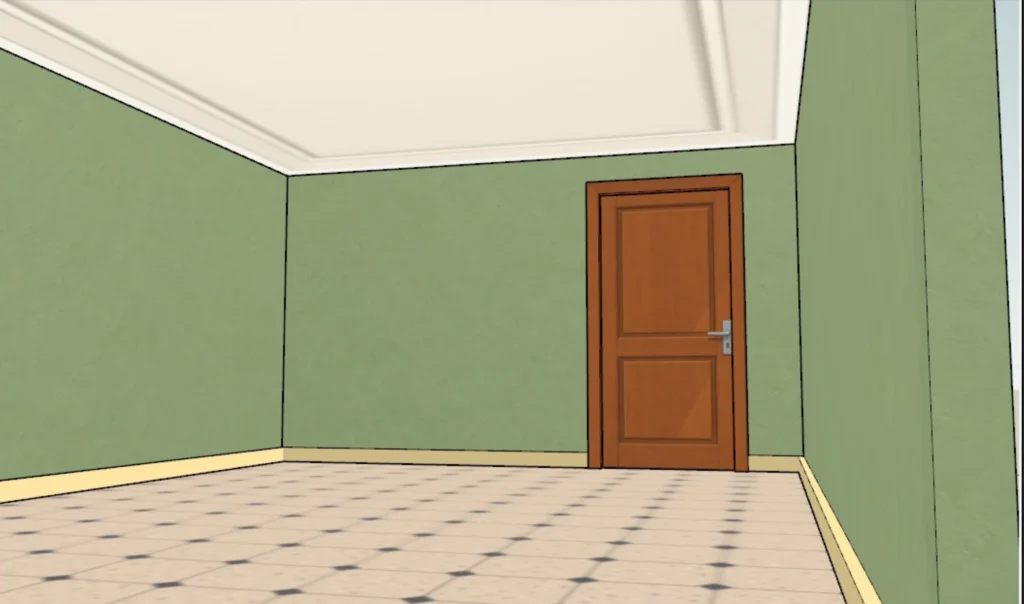
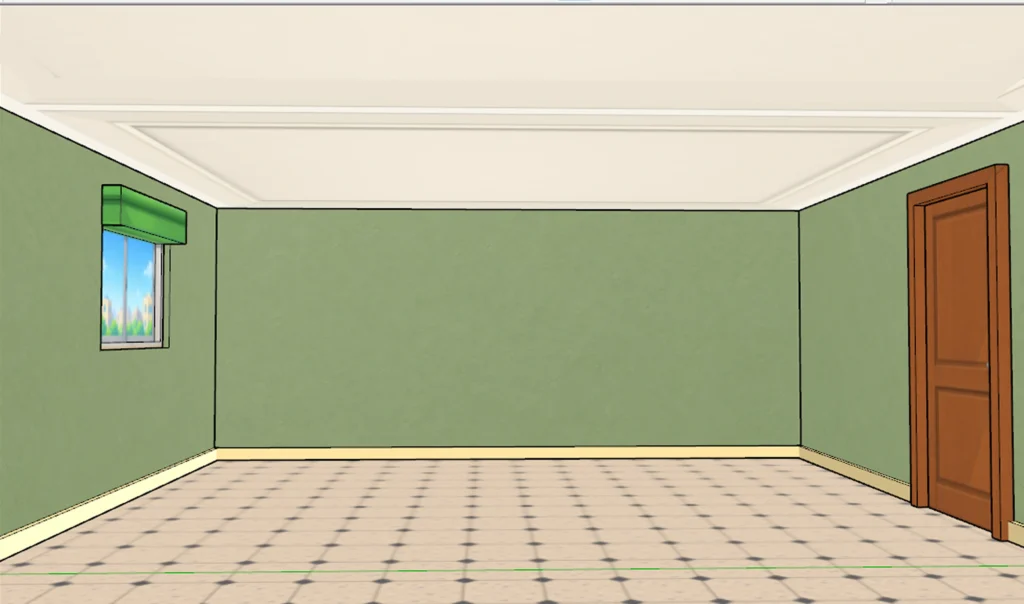
Final result
This image shows you what the room will look like after we've finished it. We still need to fill it with elements, and that's what we'll do in the next lessons.
How to color an anime background from a ready-made 3D model
I hope you enjoyed this 3D anime room design tutorial. Tutorials like this are quite rare on Arabic websites, and you're lucky to be here. You'll save a lot of time and effort by designing ready-made rooms yourself.
Thank you, and I will see you in future lessons, God willing.