نتيجة البحث
تم العثور على 478 عنصر لـ ""
- How to become an anime without courses
How to become an anime without courses How to become an anime engine from your home Recently, amateur-made anime has spread on YouTube and Instagram channels, and the reason is due to the popularity of Japanese anime, and the availability of programs and applications that allow us to make anime and cartoons from home without experience, and since I started moving more than 14 years ago Years ago, I decided to share with you the tricks and secrets that enabled me to become an animator without courses or certifications. Start drawing There is no doubt that the talent of drawing is one of the most important basic factors in the profession of animation, as the animator is basically a painter, and whoever knows drawing will undoubtedly be good at animation, because animation is the continuous and continuous drawing of frames, to reach from movement A to movement B, and It is very difficult to become an engine when you do not have the talent to draw. But the positive side is that you can master drawing with continuous education and training. There are many online lessons, including on my website, where I simplify the steps for you. It is necessary to be patient, as you will not be able to do an entire anime overnight, we know that Japanese studios need an army of animators to do one anime, let alone a single act. You can find some animation tutorials here on my channel Animation lessons Before you start your project, try to prepare the schedule for the anime, will you finish it in a month? And for how long? In the beginning, I advise you to start making an anime consisting of one episode, with a duration not exceeding three minutes, because if you overdo yourself, you will not finish the project, but if you work in a team, divide the tasks between you How do you improve your performance in the animation? Use the animation program and design small clips for entertainment, in order to develop your skills, do not take these clips seriously, so as not to tire yourself, just have fun while you move Watch many and many anime, and when you find a shot you like, repeat it, until you discover how it was animated, because anime is a treasure from which I learned animation without cycles Draw the first and last movement "as I explained in previous lessons" and practice drawing how to move the character from this position, for that, you can invent several ways, and when you find the appropriate movement, draw and color If it is difficult for you to move something, enter the websites, or YouTube, and search for how to move a part of the body, for example, hair or eyes, and start the application immediately. “This is one of the ways that helped me become a better animator.” My animation of blinking eye How to start animating the anime? Watch any anime you like before the animation, this will motivate you to start working Try as much as possible to put your cell phone away from in front of you while you are working, so that it does not distract you Play anime songs in the background while you work, this will help you a lot to enter the atmosphere Take a break from stirring every two hours, breathe on the balcony, drink Nescafe or eat some crackers before going back to work. Watch animation techniques on YouTube, and create your own style If you get bored in the middle of a stir, stop right now, because if you keep going, you'll move without care On the right is the sketch, and on the left is the final scene What you need to start anime animation ? The two devices you need are a computer or a laptop, a small tablet and a stylus for drawing only. There is no need for the home studio that you watch on YouTube channels. Expensive equipment will not give you talent, nor will it raise your status, so do not be deceived by what it has. Other animators, you are the talented and you are the one who makes, as soon as you own these two devices, you are ready to take off in the world of animation! And my favorite program is Toon Boom Harmony, I grew up with it, and I remember how it was a simple and small program when I started working on it, and with the passage of time, its features and tools increased. Of course, you can move with any program available to you, such as Adobe Animate "Flash previously", Clip Studio, Moho and many others. Software Software Take your place : It is not necessary if you want to make anime, to work in animation and drawing, there are many tasks you can do, and all you have to do is to take your place according to your talent that you have If you are a writer and author, you can compose the story, a wonderful and unparalleled anime story, with a distinctive script, and submit it in order to become an anime Or draw scenes backgrounds, such as the street, the sea, the house from the inside, the sky, and prepare them for their progression to the movers If you have a beautiful voice, participate in the dubbing of the animation, and choose the character you want to work on, and dubbing it as you act honestly Sing to work, it would be great to make an anime ending song and sing it if you have a nice voice You can also edit, after the anime ends, you assemble all the scenes, add music to them, sound effects, and write the names of the participants in the work. My animating for a bird flying The steps do not end, the world of anime is a big and beautiful world, as soon as you navigate in it you do not stop, it is true that animation takes time, but why not if you have enough time for that, instead of sitting on your mobile phone watching contents that take your time and life, Get up and leave your phone aside, and start moving, you won't stop anymore, and many doors will open in front of you متوسط التقييم هو null من 5, على أساس 0 عدد الأصوات, أعجبهم شارك Love it? Rate it Don’t love it Not great Satisfied Really good Love it
- Izaajmangaarabic
إزعاج المتفوقين
- How to make manga and create characters
How to make manga and create characters Hello everyone, today I will give you a glimpse of how to design manga characters easily, before any mangaka draws directly, he must start identifying the characters involved in the story, drawing them, and defining their characteristics and pivotal role in the manga he designs, so let's see what we've got Identification Physical traits: Is it male or female, such as skin and hair color, height and weight, in addition to the name, specify what is important, it is not necessary to write all this Character traits : Here we define the characteristics of the personality, such as quick anger, kindness, or constant laughter, and is it a cheerful or shy personality Take your time identifying your character with her own characteristics, so that the audience can get to know her more accurately Likes and dislikes: Such as favorite programme, music he likes to listen to, and what are the things he dislikes and makes him angry? For example, he hates lying, and does not accept criticism. On the other hand, he loves to draw attention Goal or dream: Here we write everything that the character wants to achieve in her life, her dream that she pursues, and what work or job she is looking for Role in the manga: Why is this character in your story? And what is its purpose? This is necessary, for example, it could be the main character, or a secondary character, specify that accurately Extra characters: There is no doubt that the manga will contain transient characters in many scenes, as the heroes of your story cannot live alone, and it is necessary to draw characters that will appear at once in several places, such as the street, the audience in the theater, school students and many others. Do not try to draw them without attention, this is one of the problems we face in the manga or anime, if the extras are drawn in quick ways, and most of the attention falls on the main characters, and this is not desirable This only applies when they are involved in the story or scene, otherwise don't bother adding details Add even a few touches to them, and do not make them seem repulsive to the audience, so that the reader does not feel that these characters are worthless! The beautiful thing here is that you do not have to design the characters of the extras, because they only appear once, and the audience will not remember them, and you do not even have to draw them in detail, just ordinary characters within the scene, with simple features. Here I have given you at least a glimpse of how to build and design manga characters, and I may one day touch on the design of the figure, but from here the main idea begins, I hope it has won your approval, and I will meet you in other lessons, until then, stay safe. متوسط التقييم هو null من 5, على أساس 0 عدد الأصوات, أعجبهم شارك Love it? Rate it Don’t love it Not great Satisfied Really good Love it
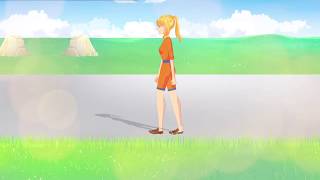
- كيف اصمم شخصية انمي تمشي
كيف اصمم شخصية انمي تمشي اليوم سنتعرف معا كيف تمكنت من جعل شخصية انمي تمشي ، بدون أي تعقيد ، و بالطبع باستخدام برنامج تون بوم هارموني. الخلفية: كليب ستديو باينت للتحميل و الشراء مرة واحدة لمدى الحياة من هـــــنـــــا برنامج المونتاج الذي استعمله دوماً هو فيلمورا Filmora ، للشراء و التحميل مجاناً ، في الأسفل أولا ، علينا ان نقوم برسم الشخصية كاملة ، من الرأس حتى القدمين ، ومن الواجب ان يتم رسم كل جزء من الجسم في طبقة خاصة بها ، كما هو موضح بالفيديو ، حيث انه عليك ان ترسم الرأس في طبقة ، ثم العيون و الفم معا ، وبعدها نرسم الشعر ، انا قمت برسم الغرة في مكان مختلف عن " ذيل الحصان " و هكذا . ثم ننتقل للذراعين و الاكواع ،كل منها في طبقة خاصة ، و بعدها الارجل فالقدمين ، وهنا نكون قد انتهينا من تركيب الجسم ، نبدأ بعدها مباشرة بترتيب الطبقات ، بحيث يجب ان تكون اليد اليمنى و القدم اليمنى في الخلف ، اما بقية اعضاء الجسم في المقدمة ، بحيث نتمكن من رؤيتها . قبل البدأ بالتحريك ، وجب علينا القيام ببعض التحسين ، فيما يتعلق بمركز الحركة ، وهو مركز كل عضو ، وكما ظاهر امامكم ، علينا ان نضغط على الذراع مثلا ، ثم اداة تحديد المركز ، ونضع النقطة على الكتف ، حتى حين نحرك الذراع ، فتبدو في موضعها الصحيح ، اما بالنسبة للرجل ، نقوم بذات الامر ، ونضع النقطة على الخصر ، ونكرر الامر نفسه مع باقي اعضاء الجسم. الخطوة القادمة ، هي التحريك ، و الذي لن يكون معقدا ، بل سهلا ممتنعا ، بحيث نضغط على اداة التحريك ، وهي الاداة المسؤولة عن تحريك الاجسام و الاغراض ، مما يجعلها تتحرك ، و بعدها نكبس حرف B ،و بينما نحن نكبس ، نضغط على الذراع الامامية ، و نحركها للامام ، و نكرر نفس الخطوة ، و نذهب للقدم الخلفية و نحركها للخلف ، و هكذا مع بقية كل عضو " بحيث تكون كل ذراع تتحرك عكس كل قدم ". الخلفية: كليب ستديو باينت للتحميل و الشراء مرة واحدة لمدى الحياة من هـــــنـــــا وهنا نكون قد اوشكنا على الانتهاء ، بحيث ننسخ و نلصق الحركات او الـ "key frames " في الـ "Timeline" من اجل ان تكون الحركة مستمرة بالمدة التي نريدها . واخر شيء هو اضافة الخلفية ، وانا رسمتها مسبقا ، و رسم كل جزء في طبقة منفردة ببرنامج كليب ستديو clip studio ،و هو البرنامج الذي استخدمه في رسم الخلفيات . وهكذا نكون بكل بساطة صممنها فتاة تمشي ، دون عناء يذكر. #تونبومهارموني #تونبوم #التونبوم #برنامجالانمي #شروح #درس متوسط التقييم هو null من 5, على أساس 12 عدد الأصوات, أعجبهم شارك Love it? Rate it Don’t love it Not great Satisfied Really good Love it
- مانجا بماذا أناديك Chapter 2
Next الفَصلُ الثّاني الفصلُ السّابِق الفصلُ التّالي
- Learn how to draw anime face | Face drawing tutorials
Learn how to draw anime face | Face drawing tutorials Welcome to the first lessons of drawing anime on my site, from now on there will be endless lessons in drawing anime or cartoon and manga characters, and let's start today with the face drawing lesson, the face is one of the most important members of the body, and it is the first thing we see when we meet someone Through it, we can know the characteristics of the person in front of us, either it turns out to us that he is conceited or nice, so we must focus on drawing him in order to give a glimpse of the character of the character that we draw. Step 1 : The first thing we do is the basic lines, or what is known as sketching, “If you are drawing with paper and pen, use a blue or red color, and do not press hard on the pen, but draw the lines gently.” These lines will help us in drawing the structure of the face, We start by drawing a circle and we will consider it the "brain", and the younger the character we draw, the larger the brain. Learn how to draw anime face | Face drawing tutorials Step 2: Then we move to draw a line that starts from the upper half of the circle all the way to the bottom. It is important to focus here, if you want to draw a young man, you have to make the line a little longer, “the chin or face is longer” and if you want to draw a child, make The line is shorter. Then you draw two diagonal lines "like an inverted triangle" from both sides, then a horizontal line, try to make it inside the circle, and a little below we draw another one. We have to know that if we want the author of the drawing to have big eyes, we have to separate the two lines a little, and these two lines are what we will rely on in drawing the ear later, and finish the matter by drawing the jaws. Learn how to draw anime face | Face drawing tutorials Learn how to draw anime face | Face drawing tutorials Step 3 : The next step comes through which we add the places where the features of the face are, such as the eyes, the nose and the mouth, and we do not forget to take into account the features of each character at this stage, there are those whose features are oval, sharp or square, and this is the appropriate stage for focus at this point. Learn how to draw anime face | Face drawing tutorials The final stage of planning is to define the hair, and we draw the hair outside the circle by 2 or 3 cm, depending on the density of the person's hair. We also draw the strands and the appropriate length for the hair, this will make it easier for you to draw later. Add details : The second stage, the initial filling: In this stage, we draw the features of the face, reduce the previous sketch "if you were drawing with a computer or mobile phone", and open a new layer or "layer", and start drawing the eyes first, relying on the previous layout, as Suitable for the character, if she is arrogant, give her two drawn eyes, and if she has an innocent look, give her a soft stink, and so on. And we move to drawing the nose, the nose should be simple, this is what it is like in the anime world, it is either a point, or a small line. As for the mouth, we tried to make it smile, and here we have relied on the triangle to help us in planning. Learn how to draw anime face | Face drawing tutorials Step 4 : And the last thing we have left is the ear, and a lot is not interested in drawing it, because it is hidden behind the hair, and this means that we also have to do the same, so that you do not tire yourself too much, and it is important to follow the two lines in which the eyes are drawn, in order to draw the ear. This is the last step of the drawing lesson, there are more lessons below, check it out. Learn how to draw anime face | Face drawing tutorials I hope you subscribe to the newsletter to receive notifications about new animation lessons, anime and manga updates, or save the site to your favorites for later reference, and I will be happy for you to share the post on Facebook, Twitter and Instagram. Perhaps someone benefits, and you can join our group that It includes talented people in dubbing, drawing, authoring and animation, where we create various projects together here متوسط التقييم هو null من 5, على أساس 0 عدد الأصوات, أعجبهم شارك Love it? Rate it Don’t love it Not great Satisfied Really good Love it
- Being busy made me avoid and hate drawing
Being busy made me avoid and hate drawing I do not hide you a secret, that I am writing this post for you in the midst of my preoccupations, between finishing the manga that I started, completing the anime movie that I finished, and sending the finished drawing requests to clients, and between making two animation scenes for a foreign singer, etc. I have to do all these things, in addition to my usual household chores, and above that I have to devote myself to sports for an hour a day. I have not been busy in my life like this, I have always been devoted to drawing, to draw what I love whenever I like, without a client telling me what to draw or improve, and these things caused me constant tension and anxiety, so I hardly found a day to rest, without holding the pen And I paint. I missed to sit and draw from nowhere as I did when I was young, without remembering that I had drawings waiting behind me. Sometimes I think to close my accounts until the request stops and I remain free from this burden, but I wake up and remember that it is my only work. Certainly, I am not the only one busy, and there may even be those who work more than me and with arduous jobs, so I have to be thankful because in the end I work in a field that I love, which is animation and drawing, the field that keeps my talent alive, at least there is no manager above my head. All day long, no specific time to go out of the house to get to the office, and I can work whenever I want and take a break whenever I want too. And now I conclude this short post for you, because I do not have time to scrutinize what I have written, and I must return to the ground and complete the tasks assigned to me more diligently. #drawing #art #myblog متوسط التقييم هو null من 5, على أساس 0 عدد الأصوات, أعجبهم شارك Love it? Rate it Don’t love it Not great Satisfied Really good Love it
- How to draw water in anime style
How to draw water in anime style Hello dear friends, in a fun and beautiful lesson, on how to draw water, or draw the sea in the Japanese anime way, the lesson will be easy, and the method is simple, and the beautiful thing is that you can draw and invent it however you want. And the background drawing program that I always used is Clip studio paint, for one-time purchase and free download, below. The drawing software 1 We draw zigzag lines, connected to each other, with curves at their ends, and they represent the movement of water 2 Draw more closed curves inside, but smaller ones, choose the way and shapes you want 3 Color the whole page in blue, and to the degree you want, it will reflect the surface of the water The drawing software 4 As we previously sketched the waves of the water surface, at this stage, we draw in white on a new layer. 5 Then when we are done, we copy the same layer that we drew in white, with the selection tool, and go to a new layer, and fill it with a little dark blue Then we stretch the layer to the left a little, to give us a shadow under the water 6 In the shadow layer, we add the effect of "blur" or "blur", in order to reduce the intensity of the shadows At the edges of the water, you can fill it up, thicken it, until it looks softer This is a closer shot 7 Final step You can add some shine, sparkle or even the reflection of sunlight, and this is the end result متوسط التقييم هو null من 5, على أساس 0 عدد الأصوات, أعجبهم شارك Love it? Rate it Don’t love it Not great Satisfied Really good Love it
- See how to anime anime car moving
See how to anime anime car moving Today I brought you a lesson that I explained years ago, but this time I decided to renew the explanation, because the program has evolved, and because I also advanced from what I was before, so it will be about how to move an anime car, walking on the road, and behind it the sky and nature And trees. Of course everything is mentioned in the accelerated video, but I will show you some small details here, Car drawing We start by choosing any image of a car from Google, and we draw it, preferably from the side, so that we can draw it moving and walking from left to right. Then we draw the two wheels with two separate layers, but you can also draw and move one wheel, and then you copy it, and drag it to the other place, so the two wheels will look the same and spin. When we finish drawing the anime car, we move to the normal drawing program, any drawing program you like, such as Photoshop, but I prefer to use the Clip Studio program for drawing anime and manga, and this is the program link to download it: Here The editing program that I have always used is Filmora, to buy and download for free from Here Animating the car In this step, we have to add peg for each element, such as car, wheels, sky, trees, etc. Then we spin the wheels from the transform tool, which helps us in the animation Then we add a keyframe to all the elements in front of us, a frame for the first movement and a frame for the last movement, and then we choose the Transform tool, and we drag all the components to the right, except for the car, and in the last frame, we drag it to the right. But the car remains stationary and does not move And in order to add some movement to the car, we add quake to it, which is what will help the car to move lightly, as if it is actually running. These are the settings that I relied on when moving the car, all I wanted was just to make it rise and fall only Extra things Additional note, note here what settings you relied on in arranging the animation components, ie the background, trees, and road From the right, choose from the menu "Top" and a window will open for you Here you can see the Top option, which allows us to place the components in 3D, as you can see here, you will find that the sky is the last thing, followed by the clouds, the grass, and so on The set of filters Here there are a set of effects that you can add to the anime, filled with fire and rain, but I only added sunshine and shade When the animations finished, I went and added a shadow to the car, through the shadow effect, which is in the Effects field at the bottom, near the timeline. And all I did was, I copied the entire car in motion, "except for the wheels," and added shade to it, turned it upside down, and put it under the car, so the shade is next to the car all the time. And in conclusion, and this is optional, I added the sun's flare, which is in the same list of effects, and placed it above the clouds and sky, and you can drag it with the Transform tool. متوسط التقييم هو null من 5, على أساس 0 عدد الأصوات, أعجبهم شارك Love it? Rate it Don’t love it Not great Satisfied Really good Love it
- First Steps To Enter Animation Industry From Home
First Steps To Enter Animation Industry From Home Who among us has not dreamed of designing his own animation? Or he joins a team or studio for the animation industry, especially since the tools are available today, from hardware and software, and so on, so there is no excuse for not entering this field, and I will guide you to the initial easy ways, in order to start entering the field of the animation industry from home Be your own animation studio In the age in which we live, everything has become available to us, and an example of that is computers, so try to provide any device according to your ability, not just computers, as tablets and mobile phones are a good start. Download drawing and animation programs that are suitable for your device type, whether you are working on a computer or mobile phone, and some of them are free, so take advantage of the opportunity and learn about them immediately. Practice and practice daily, as you will not be able to improve your use of these programs the first time, especially since the drawing skill must be available to you, so half an hour of drawing training per day is sufficient. Watch the anime and learn The best way to learn animation is to watch anime, to learn how the characters are animated, the number of frames required, and the speed of each movement, all just by watching. Watching anime also increases your desire to make your own anime, and eliminates boredom or art block, and this works for me a lot. Do not watch more than one or two episodes a day, in the end, anime is considered a waste of time, in the event that it takes all our days, so do not make your life dependent on these imaginary anime Do not lie on the sofa and watch anime for hours, as if it were a jihad, as many do, who spend their lives in closing anime as if it was an obligation. The best way to see it is when you're working, for example, open a ring on the phone, put it near you, and carry on with your work as normal Stay away from unsocial media Perhaps it is a new term for the phrase "social networking sites", because unfortunately it has become a tool that many people waste their time with, watching videos and reels that steal life and a lot of time. Your use of these spacing sites will distract you from drawing and moving, so as long as the phone is near you, you will never complete your animation. Do not forget that these sites are not a reason for you to sit alone in your room. It is necessary, after you finish drawing, to communicate with your family, leaving your phone behind. It is an appropriate opportunity to practice drawing more, by bringing your pen and sketchbook, sitting with your family, and drawing next to them. Movement is a blessing It is an appropriate opportunity to practice drawing more, by bringing your pen and sketchbook, sitting with your family, and drawing next to them. After you finish moving, get dressed, get out of the house and walk at least 6,000 steps a day, this is how you will gain more energy. Walk in the garden, among the trees and the picturesque nature, or in the street and watch people and mix with them, your mood will change a lot, and you will become more active. When we cooperate, we succeed! It is said, “Give the bread to the baker, even if he eats half of it.” And this is true. You cannot compose, draw, dub, and engineer the sound on your own. Rather, you have to cooperate with people specialized in these fields. When you finish the animation, send the characters to the dubbers. Then send all the sounds to the sound engineer when you cooperate with him, and then if you want, ask one of your brothers to produce your animations and so on. Because one hand does not clap, it is necessary to get to know your colleagues via the Internet, to share ideas, exchange experiences, and cooperate in the field of producing some episodes of animation. These were only the first steps, and it is only the beginning, to arrange yourself, and to know what you should do when you enter the field of animation, so, next time, I will walk with you the steps and programs that you will need, so wait for me! متوسط التقييم هو null من 5, على أساس 0 عدد الأصوات, أعجبهم شارك Love it? Rate it Don’t love it Not great Satisfied Really good Love it
- How to draw a handsome anime guy
How to draw a handsome anime guy Hello, dear friends, again, again, from the lesson of learning to draw anime characters easily, today we learn how to draw the character of a handsome, beautiful anime man, the concept of life, and return, it can be a midwife, without complications. coffee beans. Sketch First : We will draw a circle that "doesn't have to be regular" and that will be the brain, And a line in the middle, “which will divide the face in half, which will help us locate the nose and mouth.” And two vertical lines on each side of the circle, "and they will determine the place for drawing the ears." secondly : We draw two parallel lines horizontally, which will determine the place for drawing the eyes and ears, then we draw a shape that looks like the letter V Third : On the special side of the horizontal line, we draw a sharp rectangular shape "through which we form the size and shape of the eye" according to what you have chosen for the anime character And we determine the location of the nose and eyes For the guy in the anime world, it is necessary to take these things into consideration: The length and width of the face, we cannot draw a smooth or oval face, and we do not forget to define the chin well and highlight it As for the nose, it should be "taper" so to speak, and straight without any curve. Make up the face of the anime character Before the step of inking in black, we must first define the shape of the eyes of the anime man that we are drawing, through geometric shapes only. Here I decided to draw two mysterious eyes with you, which I think are beloved by many anime fans, and they will give the young man more attractiveness, it is very easy. Eyes : We draw a straight line only, and a short line extends from it at the end of the eye of the anime "Tearful Eye" At the back end of the eye, we draw a sharp angle downward We finished! Yes, you said that drawing the eye of the mysterious character is easy, right? Nose : There are several forms known in the world of anime to draw the nose, and today I chose a distinctive shape, which is drawing a vertical line in the middle of the place that we previously determined to draw the nose of the anime, and near it is what looks like a shadow, in a triangular way. You can add the nostril, by drawing a dot or a small line, it's up to you Lips : We draw it so that it is frowning, or serious, and it is a slightly downward curved shape. Hair : We choose the location of the hair, from the forehead, and it is up to you, in determining the width or area of the forehead, and from there, we draw the hair of the anime character And we conclude by drawing the ears at each end Inking Here we have reached the easy stage, that is, the inking stage, relying on the prior “sketch”, and all we have to do is just draw over it. We dilute the previous layer We create special layers for each section of the character: the face is in a layer, the hair is in a layer, and so are the clothes. Select the pen tool, black color for inking and start drawing In order to get perfect inking, we press the pen lightly some times We add "out of the box, as they say!" Coloring After the stage of inking the anime character, we now start with coloring, which is an easy stage, and in order to obtain consistent colors, we must choose the appropriate colors, and in this step I rely on the Adobe site, and since we are drawing a handsome young man with mysterious features, I will choose a hair color Brown, blue shirt, and stay away from bright colors, because Japanese anime studios rely on matte colors. We color the skin, hair and eyes, and then the clothes with the basic colors We add shading, by choosing a darker color than the base color You can add a second shading, so that it is darker than the previous one, but we only add it at the corners. We draw highlights, and I only add them to the hair, and rarely to the face All of our drawing has ended, and this is the result, I hope it has satisfied you, and I promise you that I will add more lessons to the site, and if you want specific lessons, all you have to do is write to me, and I will arrange the matter, bye متوسط التقييم هو null من 5, على أساس 0 عدد الأصوات, أعجبهم شارك Love it? Rate it Don’t love it Not great Satisfied Really good Love it
- Draw anime face looking to the side and up
Draw anime face looking to the side and up Welcome to a new explanation, about how to draw the face of an anime character looking up with ease, there is no doubt that drawing the face from different angles, because it is complicated, especially when the anime character is looking up, and sometimes I have to draw again and again, until I get Desired result, so I'm going to show you my drawing method, hopefully it will help you. 1 The beginning is, "as you used to from me," to draw a circle that "symbolizes the head," and from there, we draw the dividing line for the face, in the direction the character looks at. And as you can also notice, we draw two parallel lines for the eyes, above which is the forehead line, and from below, we determine the location of the chin It is necessary to locate the chin and neck, because the anime character here looks up, and in this way the neck appears more in the picture. Here I determined for you the location of each of the facial features, as it appears in front of you in the picture. Save the picture with you until you return to it later. The dividing line for the face "in the middle of the face" where we will draw the mouth and nose later From above the front line The two lines for the eyes Below is the chin line On the ear line side 2Using the previous planning, we will now draw the details of the anime character's face, and I wrote to you on the picture how it is done The eye on the right appears larger and longer because it is facing the camera, as we know the farther the object is from the camera, the smaller it is The nose is pointing in the direction the character is looking at And the head, as you can see with me, appears more from the back, that is, we have to draw the hair more clearly there. And since the character is looking to the side and slightly upward, the tip of the nose will be slightly raised And it is important not to forget the appearance of the neck when the anime character looks up You can draw the mouth just below the nose, because I prefer to make it a little further, in order to give the drawing some depth. Here is the drawing, after we followed all the steps mentioned above, on how to draw an anime character looking to the side and slightly upward 3 Here we will add some details that will be to your taste, so you can draw anime hair however you like Notice when we drew the hair, in the middle, "depending on the dividing line of the face," we can easily determine the location of the hairline, and draw the tufts starting from that point, and the hair does not flow in one line, but rather goes in all directions, so when we approach from the back, the hair goes backwards, And when we go to the side, the hair goes to the side, and so on! On the left side, the anime's poetry "since it's far from the camera" appears less, and the poetry we drew on the right side appears much more. Some mistakes to avoid On the right side, we see that the nose is long, almost as long as the face, and this is a fatal mistake, because this anime character looks up slightly, so it is normal for the nose to rise up, otherwise the drawing will look incorrect From below, the chin appears wider as well, and from below it the neck emerges As for the mouth, it is like the nose, we raise it up as well, and it is wrong to draw it at the bottom. Thus, the lesson for today has ended, and I tried to show the correct ways to draw the face of the anime from a different angle, while showing some mistakes and avoiding them, and we will complete this series in the coming lessons, so we will draw the face of the anime from more difficult angles, so that we can learn together, and to That time, I hope all of you, my friends, will practice these steps today. متوسط التقييم هو null من 5, على أساس 0 عدد الأصوات, أعجبهم شارك Love it? Rate it Don’t love it Not great Satisfied Really good Love it