Welcome to a new tutorial! Today, we'll learn how to draw an anime face from above using simple, practical steps that will help you overcome the difficulty of drawing characters from different angles. Drawing a face from various angles is undoubtedly one of the most complex tasks, especially when the anime character is looking upwards. Therefore, I'll share my drawing method with you today, hoping it will help you develop your skills.
My Patreon account where you can find a detailed screenshot of the animation
First step
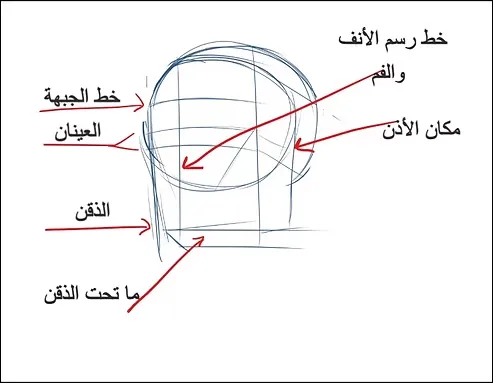
The beginning is by drawing a circle that represents the head as a starting point for drawing an anime face from above. From there, we draw the dividing line of the face in the direction of the character's gaze, to help us later in determining the direction of the rest of the features.
As you can see, we draw two parallel lines to mark the position of the eyes, adding a forehead line at the top, and a line at the bottom to mark the position of the chin in order to maintain the balance of the drawing.
It is necessary to determine the location of the chin and neck, because the anime character here is looking upwards, and in this way the neck is more visible in the picture.
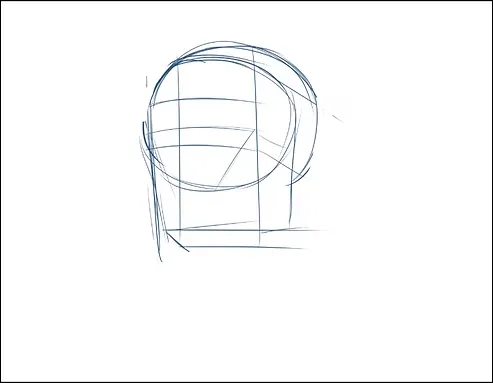
A closer look
Here I have identified the location of each facial feature, as shown in the picture. Save the picture so you can refer back to it later.
- The dividing line of the face, where we will draw the mouth and nose later.
- From the top, the front line.
- The two lines designated for the eyes.
- Below is the chin line.
- On the side, the ear line.
Step two
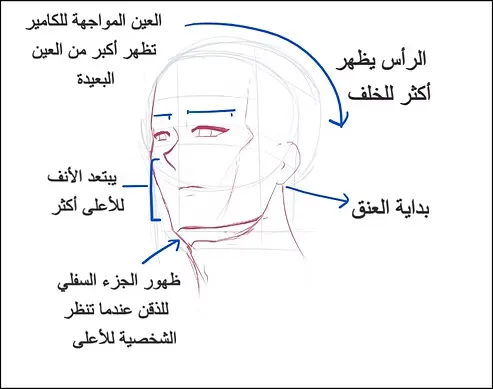
Using this previous plan, we will now begin to easily draw the details of an anime face from above. I have shown you the method in the attached image to make it easier for you to follow:
- The right eye appears larger and longer because it is closer to the camera. Always remember that objects closer to the camera appear larger, and this is a very important rule in drawing an anime face from above.
- The nose points in the direction the character is looking, and we must consider the angle of the head to make the drawing balanced.
- As you can see, the head appears more clearly from the back at this angle, so the hair should be drawn more clearly at the back to give the drawing a distinctive look.
- Since the character is looking up and slightly to the side, the tip of the nose will be raised slightly upwards to make the shape look natural.
- It is also essential not to forget to draw the neck clearly, as it becomes more visible when the anime character looks upwards.
Initial result
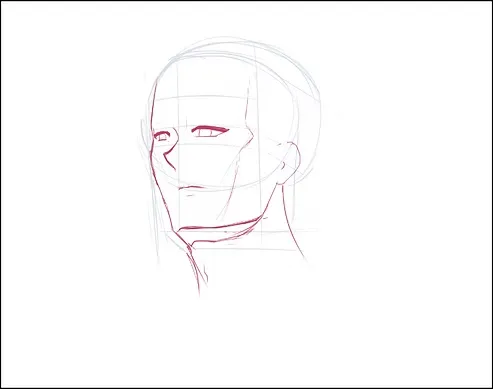
And here is the result after following all the previous steps, where we drew an anime face from the top with a natural slant to the side.
At this stage we see that the face drawing is finished, and all that remains is to add the hair.
Drawing a manga face: the best way to draw a bottom perspective
Step three
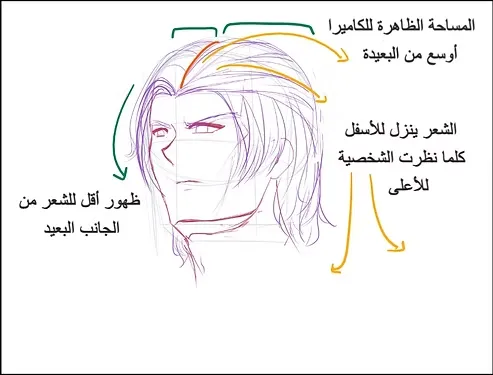
Here we will add some details that reflect your personal style, such as drawing the hair in the way you want to make the drawing unique.
Notice that when we draw the hair, in the middle (based on the dividing line of the face), we can easily determine the location of the hairline and draw the strands starting from that point. The hair does not run in one line, but rather goes in all directions. When we approach the back, the hair goes back, and when we go to the side, the hair goes to the side, and so on!
On the left side, the hair is less visible because it is farther from the camera, while on the right side, the hair is more visible because it is closer to the camera.
Some mistakes to avoid when drawing an anime face from above
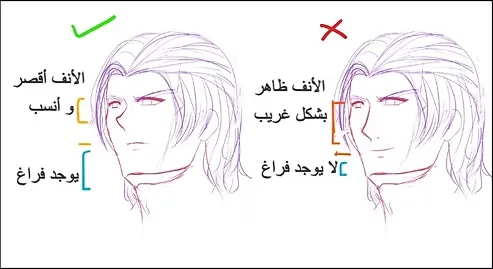
On the right side, we see that the nose is long, almost the length of the face, and this is a serious mistake, because this anime character is looking slightly upwards, so it is natural for the nose to be raised upwards, otherwise the drawing will look unrealistic.
From below, the chin appears slightly wider, and below it, the neck stands out clearly.
As for the mouth, just like the nose, we raise it upwards as well, and it is a mistake to draw it at the bottom.
And so today’s lesson has come to an end. In it, I tried to explain the correct way to draw an anime face from above from a different angle, while also clarifying the mistakes that many people make and how to avoid them.
We will continue this series in the next lessons, God willing, where we will learn to draw an anime face from more difficult angles to further develop your skills. Until then, I hope, my friends, that you will practice these steps today and apply them in your upcoming work and projects to master drawing characters in a professional style.